Thursday, March 27, 2014

Easter Trifles (with Chick Macarons)


Easter Trifles (with Chick Macarons)
Aren't they adorbs?! They are individual serve chocolate & orange trifles topped with a white chocolate nest, speckled eggs and orange white chocolate chick macarons. A bit of a mouthful and certainly much more complicated than last years super popular Cheesecake-Filled Chocolate Easter Eggs, but so worth the effort.
Easter Trifles (with Chick Macarons)
 
 
Easter Trifles (with Chick Macarons)
 
 
Easter Trifles (with Chick Macarons)
 
 
Easter Trifles (with Chick Macarons)
Chocolate & Orange Trifles with Chick Macarons
(serves approx 6-8 people, makes about 15 macarons)
For the macarons: (if you are a beginner with macarons, read up and practice plain macarons first. BraveTart has lots of useful advice and info on the subject)
100g aged egg whites (you can use fresh eggs too, just make sure they are room temperature. I always use fresh these days, and zap it in the microwave on defrost for 10 seconds)
1/2 tsp salt
110g almond meal, at room temperature and well sifted
200g icing sugar
50g caster sugar
Yellow food colouring (powdered or gel)
Optional: 1 tsp powdered egg whites (available from The Essential Ingredient), helps to stabilise egg whites but is not necessary
To decorate: Orange heart sprinkles/orange candy coated fennel seeds, black food colouring,
Line two baking sheets with baking paper. Place icing sugar in food processor and pulse for a minute to remove any lumps. Stir in almond meal and pulse for about 30 seconds to combine. Sift into a large mixing bowl and set aside. Using an electric mixer, beat egg whitesm salt and egg white powder in a medium mixing bowl until the egg white powder dissolves and it reaches soft peaks. With the mixer on high speed, gradually add sugar and beat until it reaches stiff peaks. (You can add the food colouring to the meringue as you are beating it to stiff peaks, it makes it easier to adjust how much colouring to add. Otherwise add it in the next step.)
Add meringue to your dry mixture and mix, quickly at first to break down the bubbles in the egg white (you really want to beat all the large bubbles out of the mixture, be rough!), then mix carefully as the dry mixture becomes incorporated and it starts to become shiny again. Take care not to overmix, the mixture should flow like lava and a streak of mixture spread over the surface of the rest of the mixture should disappear after about 30 seconds. Place mixture in a piping bag with a 1cm round piping tip. Pipe rounds about 3cm diameter, leaving at least 2cm space around each one. Tap baking sheets carefully and firmly on the benchtop a couple times to remove any large bubbles. I carefully topped half the macarons with two heart-shaped orange sprinkles for the feet and a candy coated fennel seed for the beak, then piped the wings on using a narrow star tip. (This does make the shells more susceptible to cracking, as an alternative you can bake the shells plain and pipe on decorations later with royal icing.)
Leave to dry for about an hour, so that when you press the surface of one gently it does not break. This will help prevent any cracking and help the feet to form on the macs. Preheat your oven to 130-150°C (265-300°F), depending on your oven. You can place the sheet of piped shells on top of an upside-down roasting tray or another baking sheet if your sheets are not professional grade, for better heat distribution. Bake for 20-25 minutes, depending on the size of your shells. Carefully test if the base of the shell is ready by gently lifting one and if it's still soft and sticking to the baking paper, then it needs to bake for a few minutes longer. Remove from the oven and cool on the tray for a few minutes, then gently remove from the sheet and place on a wire rack to cool completely. I used a wooden skewer dipped in black food colouring to draw on the eyes.
For the orange ganache:
200g (7oz) white chocolate, finely chopped
100ml (just over 1/3 cup) thickened (heavy) cream
Zest of one orange + 1 tbsp orange juice
Place white chocolate and orange juice in a medium mixing bowl. Heat cream and orange zest in a small saucepan over low heat until it just comes to the boil, stirring regularly. If you want a smoother ganache, strain the zest out at this point. Pour hot cream over white chocolate and leave to sit for about 3-5 minutes, then gently whisk until the chocolate melts and the mixture is smooth. (If it does not completely melt, place bowl over a small pot of boiling water and whisk until smooth.) Chill until mixture thickens but is still pipable, then sandwich in between macaron shells.
Easter Trifles (with Chick Macarons)
For the orange jelly (feel free to replace with packet orange jelly or segmented fresh orange slices):
1/2 cup water
Peeled rind and juice from 3-4 oranges
1-2 tbsp sugar, adjust to taste
2 tbsp powdered gelatine + 1/2 cup water
Optional: 1 tbsp Grand Marnier
Grease a 20cm square cake tin with vegetable oil or line with baking paper. Place powdered gelatine in 1/2 cup water and set aside to soften. Heat 1/2 cup water plus the peeled rind and juice in a small saucepan and simmer for about 5 minutes. Strain out the rind and add sugar to taste. Gently whisk in softened gelatine and Grand Marnier and pour into prepared tin. Chill for at least 3-4 hours until set or overnight. 
For the chocolate sponge:
Use this recipe from Gourmet Traveller, which I always use for my Tim Tam Cake. You can also use store-bought sponge.
To assemble:
475ml (about 2 cups) thickened cream
1 tsp vanilla bean paste (or scraped seeds of 1 vanilla bean pod)
White chocolate (about 100g), grated
Optional: 1 tbsp Grand Marnier plus extra for brushing sponge, easter eggs to decorate
Chop orange jelly into 1 cm cubes. Whip cream with vanilla beans to soft peaks and then fold in Grand Marnier. Cut rounds of chocolate sponge about 2 cm thick to fit into about 6 serving glasses (I found my sponge baked quite high so I could actually cut each round into two layers). Place one layer of sponge, brush with Grand Marnier, top with a layer of jelly cubes followed by a layer of cream. Repeat. Top with a layer of grated white chocolate, a chick macaron and easter eggs to decorate. Chill in the fridge for an hour and then serve. If you are not serving immediately do not assemble and do not whip the cream. Keep other components in fridge and then whip cream and assemble when ready to serve.
Easter Trifles (with Chick Macarons)

Cheesecake Chocolate Eggs

cheesecake_easteregg_cups
It's hard to believe Easter is just around the corner. This year is going too fast for me to keep up! I swear it felt like yesterday that I was laughing at how quickly the Easter displays went up to replace the Christmas stuff at the beginning of the year, it has managed to creep up on me. My days are getting busier and busier, so I am easily drawn to the simpler, quicker desserts that I can pull together at the last minute. This recipe could not be any easier; there's no baking involved and it takes hardly any time to create these cute Cheesecake-Filled Chocolate Easter Eggs with a 'yolk' made of passionfruit sauce.
cheesecake_easteregg_cups-7
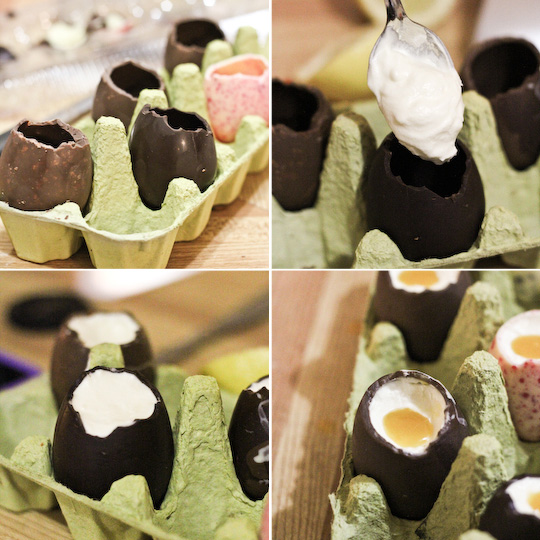
I took it as a compliment when Lisa (who hates eating eggs) said that these looked so much like real eggs that she was a little creeped out by them. The texture of the chilled cheesecake and the passionfruit sauce looks just right, making it a great filling for some regular hollow chocolate easter egg shells that I cut the tops off. I was inspired by the chocolate-mousse filled Easter egg cups that I've seen on sale and decided to do my own spin on that idea but with a cheesecake filling and a deliciously fruity filling in the centre that would look like an egg yolk. So it looks a little like a creme egg. It's not the same but it's just as tasty.
Cheesecake Filled Chocolate Easter Eggs
I used my regular chilled cheesecake filling recipe for this, and made up a sauce using passionfruit pulp, apricot jam and a little bit of butter. There's enough sourness from the passionfruit (and the lemon in the cheesecake) to make this a light, creamy and not overly sweet dessert. And it does not get easier than this. It's quite interesting to see how simple this recipe is compared to the Easter Bunny Macarons (including all the hilarious scenarios that I got carried away with while photographing them) and Hot Cross Bun Ice Cream Sandwiches that I came up with last year. This recipe is much quicker and less complicated, but hopefully just as enjoyable to eat!
cheesecake_easteregg_cups-2
Alright, I admit I may have taken a few too many photos of these little treats. Probably more than was necessary. But I am still a little scarred from all the trouble I had with the ugliness that way my Twix Cake so I was just happy to have something cute and not falling apart to photograph. Surprisingly A was all excited when he saw these in the fridge and quickly ate two of them, I can never guess which of my recipes he'll end up liking but he was a big fan of the fluffy cheesecake filling and the small hit of passionfruit in the centre. Technically it's more of a cheesecake mousse since there's no crust (though you could put some crust at the bottom of each egg if you wanted) and it's not baked, or a cake.
cheesecake_easteregg_cups-5
So if you're looking for a really, really, REALLY easy and light dessert to serve up after a big meal during the Easter break then these are for you. They can be eaten with a small spoon or devoured like a creme egg, whatever floats your boat. I bought the chocolate eggs from the supermarket, but if you're feeling really adventurous you could try making your own. Any plain, regular-sized hollow chocolate eggs will do. I got some very pretty ones that had all different flavours, I especially liked the look of the white chocolate and strawberry shell below. I hope everyone has a wonderful Easter holidays, I am looking forward to some time off!
cheesecake_easteregg_cups-4
Cheesecake-Filled Chocolate Easter Egg Cups
(makes 6-8 regular sized easter egg cheesecakes, you may need to adjust the amount of cheesecake filling depending on the size of your eggs)
6-8 hollow chocolate easter egg shells (mine were from the supermarket, approx 6cm tall and 4cm at its widest width, apparently they're not so easy to find in the US so if anyone can find a good online store let me know and I'll link it, apparently you can find them in the US at See's Candy and Costco, thanks Birgit! And on eBay. And HERE at Amazon.com, thanks Tuscadero! Or make your own here. Another commenter rolled melted chocolate around the inside of a cleaned out egg shell and then peeled away the shell when it was set.)
150g (about 5oz) cream cheese, softened
30g (about 1/4 cup) icing sugar (confectioners' sugar), sifted
1/2 tsp lemon juice
1/2 tsp pure vanilla extract
125ml (about 1/2 cup) thickened/heavy whipping cream
For the 'yolk': 1 passionfruit, 1 tbsp apricot jam, 1 tbsp (about 15g) unsalted butter (passionfruit juice can be replaced with about 2 tsp of freshly squeezed orange, mandarin juice or mango, peach nectar, you can adjust the amount of juice to taste), alternatively you can substitute with any fruit curd you prefer.
Optional: you can include some cheesecake crust crumbs at the base of each egg if you really want to include some sort of crust into the dessert.

Using a small serrated knife, carefully remove the tops of the chocolate eggs. (A couple of people have mentioned that heating the knife under warm water will make this easier and neater, thanks for the tip! But personally I like having the jagged edges.) Place the eggs in the fridge to keep them chilled while you prepare the cheesecake filling, you can use egg cups or your fridge egg holder (Don't use an egg carton like me. I shouldn't have used it but I was desperate at the time, I bought the egg cups the day after!). Place the cream cheese, icing sugar, lemon juice and vanilla in a large mixing bowl and beat on high until the mixture is smooth and fluffy, about 3-4 minutes. Set aside and carefully whip the thickened cream in a separate mixing bowl to stiff peaks (watch it closely as thickened cream is very easy to overwhip and split). Using a whisk, gently combine the whipped cream into the cream cheese mixture until it is smooth. Carefully spoon or pipe the mixture into the prepared chocolate shells. Chill eggs for at least 30 minutes to allow it to set.
collage_template1
Prepare the passionfruit sauce; strain passionfruit pulp to remove the seeds and place in a small saucepan with the apricot jam and butter. Gently heat on low, whisking until the butter melts and the mixture is smooth. Remove from the heat and allow to cool. (If your apricot jam is chunky you should strain the sauce at this point) Place in the fridge and chill until it thickens slightly. Using a small spoon, carefully scoop out a hole in the centre of each cheesecake, about 1 cm deep and wide. Fill hole with some of the chilled passionfruit sauce and return the eggs to the fridge to chill again for at least 30 mins. Remove eggs from the fridge about 10 minutes before serving. Can be made 2-3 days in advance, keep eggs in the fridge in a holder inside an airtight container or covered tightly with clingfilm to stop them drying out.
cheesecake_easteregg_cups-6

FFXIV Patch 2.2 Unlocking Dance Emote, Vanity, Dungeon and etc..

DANCE EMOTE LOCATION (MOST IMPORTANT) =P

Help Me, Lord of the Dance
Level 14
NPC: P'molminn
Ul'dah - Steps of Nald
(X:10 Y:9)
Broadening Horizons
New Gridania
(X: 12, Y:13)

Good for What Ales You
NPC:    Dodozan
Limsa Lominsa Lower Decks -Hawkers' Round  
(X:7 Y:-12)

“To unlock the final dance you go through the new Hildibrand quest. “
-bierrez


Vanity Unlock: Glamours
Pre-Requirements: Level 50
Entry Quest: A Self-improving Man
Quest NPC: Wiscard
Location: Mor Dhona X:22 Y:6

Vanity Item Purchase: Clear Prisms & Glamour Dispellers
Purchase NPC: / Location:
*Bango Zango / Limsa Lominsa Lower Decks – X:9 Y:11
* Maisentra / New Gridania – X: 11 Y:11
* Roarich / Ul’dah: Steps of Nald The Goblet – X:10 Y:9
Token Trade: Philosophy trade-in
NPC: Auriana
Location: Mor Dhona – Revenant’s Toll

Crafting: New Crafting Tools
Pre-Requirements: Level 50
Entry Quest: Just Tooling Around
Quest NPC: Guiding Star
Location: Revenant’s Toll X: 21 Y: 6
Crafting: Master Recipe Books Unlock
Pre-Requirements: Level 50 Disciple of the hand
Entry Quest: Submission Impossible
Quest NPC: Wiscard
Location: Mor Dhona X:22 Y:6
Crafting: Master Recipe Books for Glamours
Pre-Requirements: Level 50 crafter & have first completed: "Submission Impossible”
Quest NPC: Tataroga
Location: Revenant’s Toll X:22 Y:6
Crafting: Master Recipe Books for Crafting
Pre-Requirements: Level 50 crafter & have first completed: "Just Tooling Around”
Quest NPC: Talan
Location: Revenant’s Toll X:22 Y:6

Retainer Unlock: Ventures
Pre-Requirements: Level 17
Entry Quest: An Ill-conceived Venture
Quest NPC "troubled adventurer”
Location:
* Limsa Lominsa Lower Decks X:9 Y:11
* New Gridania X:11 Y:12
* Ul’dah – Steps of Nald X:9 Y:8
Housing Unlock: Gardening
Pre-Requirements: Must have purchased estate land
Purchase NPC: Housing Merchant
Location:
* Mist – X:11 Y:11
* Lavendar Beds – X: 11 Y:8
* The Goblet – X:11 Y:8
Housing Unlock: Merchant Permits
Locations:
Mist (X:11, Y:11) - Independent Sutler
Lavender Beds (X:11, Y:10) - Independent Sutler
The Goblet (X:11, Y:11) - Independent Sutler

Main Story Quest: Main Story Expansion
Pre-Requirements: Level 50
Entry Quest: Still Waters
Quest NPC: Minfilia
Location: Mor Dhona – The Rising Stones
(X:6 Y:5)
Side Story Quest: Hildebrand
Pre-Requirements: Level 50
Entry Quest: The Science of Deduction
Quest NPC: Ellie
Location: Eastern Thanlan X:10 Y: 16

Beast Tribe Quest Lines: Kobolds: 789th Order Dig
Pre-Requirements: Level 41 and must first complete main scenario quest ” In Pursuit of the Past”
Entry Quest: Highway Robbery
Quest NPC: Trachraet
Location: Limsa Lominsa – Upper Decks (X:12, Y:12)
Beast Tribe Quest Lines: Sahagin: Novv’s Nursery
Pre-Requirements: Level 44 and must first complete main scenario quest ” In Pursuit of the Past”
Entry Quest: They Came from the Deep
Quest NPC: R’ashaht Rhiki
Location: Limsa Lominsa – Upper Decks (X:13, Y: 12)
Dungeon: The Lost City of Amdapor
Pre-Requirements: Level 50, item lvl 55, and must have complete "The Ultimate Weapon”
Entry Quest: One Night in Amdapor
Quest NPC: E-Sumi-Yan
Location: Old Gridania X:6 Y:10
Dungeon: Halatali (Hard)
Pre-Requirements: Level 50, item lvl 55, and must have complete "The Ultimate Weapon”
Entry Quest: This Times’s for Fun
Quest NPC: Hugubert
Location: Mor Dhona X:22 Y: 8
Dungeon: Brayflox Longstop (Hard)
Pre-Requirements: Level 50, item lvl 55, and must have complete "The Ultimate Weapon”
Entry Quest: Curds and Slay
Quest NPC: Bloezoeng
Location: Mor Dhona X:22 Y: 8

Trial: The Whorleater (Leviathan Hard)
Pre-Requirements: Level 50 and must first complete main story quest "Into the Heart of the Whorl”
Entry Quest: Lord of the Whorl
Quest NPC: Eynzahr Slafyrsyn
Location: Lower La Noscea X:24 Y:33
Trial: The Whorleater (Leviathan Extreme)
Pre-Requirements: Level 50 & must complete "Through the Maelstrom” & "Bowl of Embers (EX)”
Entry Quest: Whorl of a Time
Quest NPC: Urianger
Location: Western Thanlan – The waking Sands X:6 Y:4
Trial: Thornmarch (Extreme)
Pre-Requirements: Level 50, ilvl 80 and must complete "On the Properties of Primals” & "Bowl of Embers (EX)”
Entry Quest: The King Lives
Quest NPC: Urianger
Location: Western Thanalan – The waking Sands X:6 Y:4
Raid: Second Binding Coil of Bahamut (Turn 6 – Turn 9)
Pre-Requirements: Level 50 and must first complete Turn 5 & "Alisaie’s Pledge”
Entry Quest: Another Turn in the Coil
Quest NPC: Urianger
Location: Western Thanlan – The Waking Sands X:6, Y:4

Related Quest: ????(Name TBA – )
Quest NPC: Alisaie
Location: Northern Thanalan – X:20 Y: 17

FFXIV Patch 2.2 Dungeons Tips and Tricks

Dungeons

Brayflox's Longstop Hard Mode Guide

(Courtesy of GabrielCeleste on reddit.com)


TRASH
Most of the trash is similar to the original Brayflox's Longstop. You'll find a decent amount of Deep Jungle Coeurls (including a white version that looks amazing) and other assorted jungle creatures. There were one or two roaming coeurls (notable one near the wooden ramp midway through the stage) but nothing to really worry about. Once you reach the goblin town from the original dungeon, you have to clear out several groups of trash again to free the imprisoned goblins. There's isn't any danger of losing any goblins from what I could tell since they don't appear until after the trash is defeated, but you do have to clear all of it for Brayflox to blast open a secret passage to the last area. Lastly, right before the ascent to the final boss, there are some Illuminati Footmen that will periodically summon Gobbie Beak adds (pelicans), so unless you kill the footmen, you'll face a continuing wave of gobbie beaks. This might be a good way to farm the dungeon though, lol.


DANGERS
In the first area, your party is susceptible to random AOE attacks being launched from the final boss high up on the mountain. All you can do is dodge them, but they're pretty infrequent and not very potent. It can also be easy to overpull in the dungeon, especially since most of the trash packs have three or more monsters together.
Runstop Frontblock


The boss is called Gobmachine G-VI. It appears to be some sort of mini-tank constructed by the Illuminati that have taken over the area. This fight is sort of hazy for me because I didn't really notice an important gimmick that would have caused us to wipe aside form simple dodging. The boss's primary attack seems to be a crosshatch pattern of AOE lines that make a tic-tac-toe shape across the arena. The cast timer is fairly fast for this, so you need to move out of the way immediately. As the boss gets weaker, it appears to double up the amount of horizontal and vertical lines to cover more ground, so you may have to dodge twice in quick succession. Lastly, Illuminati Glider adds will spawn at various times, and one of them will attach a tether to someone. I'm not sure what this accomplishes, however, be we burned them down before anything noticeable happened.


Brayflox's Drossdump
The second boss is called Magitek Vangob G-III. This fight has the potential to become very dangerous, as you'll see in a moment. The boss itself is a magitek suit pieced together from goblin trash using the power of ceruleum. As you can imagine, the engineering isn't that great, so Ceruleum seems to spill out of it throughout the battle, creating vivid blue circles of liquid that start to cover larger and larger chunks of the arena. After several pools of ceruleum have spilled, the boss sets off a bomb of some kind that will explode and cause all of the ceruleum to ignite as well, doing a large chunk of damage to anyone still inside the blue zones when it goes off. Getting out of the blue areas all depends on your tank's ability to kite the boss (similar to Aiatar) and your own positioning around the walls to keep the ceruleum from covering too much ground.


From time to time, the boss will call out two Illuminati adds that must be DPS'd down in quick fashion. After a set amount of time, the boss will use a Halicarnassus-like aerial attack that does damage based on the health of the adds. They were always dead by the time the attack happened for my group, so the damage was pretty minimal (maybe 500 HP?) but I would imagine that it gets much worse if an add is still alive.


Swiftmake Checkgate
The final boss is named Gobmachine G-VI. This fight is probably one of the funniest fights in the game so far. The battle starts out with a red goblin tank. As you DPS it down to about 80% HP it will periodically use an AOE attack on a ranged party member, but that's easily dodged. At around 80% it changes to Phase Two!


In the second phase, the boss will start circling the room's outer perimeter and become untargetable. The party needs to immediately gather in the center of the room to avoid the circling tank. Two Illuminati adds will spawn, one of which is tethered to a party member. Obviously, just kill both adds fast to avoid whatever effect they may cause if they're left alive too long (not sure what it is). A few seconds later, it will launch a massive amount of bombs that cover the entire area. At first this looks hopless, but there's a trick to it. If you target a bomb and hit it, the bomb will be knocked far away from your current location. By standing in the middle, all the bombs will be knocked towards the walls of the arena, making the center safe to stand in. Obviously, all party members should use AOE abilities to clear out the very center and the single-target the bombs in the mid-range area so that everything is pushed up against the edge of the arena. This should give you just enough room to survive without taking any damage. Two blasts are survivable with 4400 HP, but just barely.


The cycle then repeats two more times. There seemed to be more bombs on the second and third cycles, and I also noticed a total of three Illuminati adds by the end, two of which had tethers on people.


Once the boss's HP gets very low (10% or so) it will go untargetable and turn towards someone at random, rev its engine for a moment, and then barrel toward them. I imagine this can be dodged, but I got hit because I didn't expect it. It did about 1800 damage or so. After that, the boss will spawn one final add... a MASSIVE BOMB. This is a DPS check. We killed it in time, but I imagine it probably wipes you if you don't. After the bomb is killed, the boss can be destroyed.


REWARDS
Boss 1: 20 Tomestones of Mythology
Boss 2: 30 Tomestones of Mythology
Boss 3: 45 Tomestones of Soldiery


TREASURES
A. The alcove on the north wall before the first boss
B. First Boss
C. Second Boss Left Chest
D. Second Boss Right Chest
E. On a landing before the Longstop section
F. Final Boss


Halatali Hard Mode Guide

(Courtesy of GabrielCeleste on reddit.com)


TRASH
It's mostly unremarkable. If you remember the original Halatli, just keep an eye out for roaming Peistes along the catwalk areas of the first two areas. In the second area (where Firemane was originally), there is a surprise attack with three bears that come out of the hallways where the Damantus used to spawn at. Make sure your tank is ready to pick them up after they show up. In the final area, you are faced with three different battles against humans that play our classes. The obvious rule is to take out the healer first if there is one, then the ranged, then the melee, and finally the tank. Pretty easy stuff.


DANGERS
The ceiling is rigged with numerous ball-and-chain devices that will slam down on the ground and inflict several hundred damage each time, so don't be a dolt and stand under them too long (if at all). Also, each area requires a teleport to reach similar to the original, so don't forget to pick up treasure chests before leaving the boss areas.


The Hall of the Crupellarii
The boss is a cyclops similar to Coincounter. Try not to stand in front of him unless you are a tank as he has his usual swipe attacks. He can also turn towards any ranged or healer and do that damned eye of the beholder attack, so make sure to mobilize if he starts turning.


The special mechanic of this fight is the Mammet. Periodically throughout the fight, a mechanical Mammet will start marching aimlessly around the room with a tether attaching it to a lever at the back of the room. Interacting with the lever will cause the Mammet to stop and start radiating a blue aura that will grant the "Manawall" buff to anyone standing inside it before it fades away about 10 seconds later. The trick is to wait until the cyclops starts charging his 100 Tonze Swing attack, which will cover the entire arena, and then activate the lever and get the buff before his charge bar fills. The Manawall effect will negate his swing attack, otherwise expect to take several thousand damage.


The Hall of the Bestiarii
The boss is Catoblepas, a gorgon-type bull that can turn people to stone with its Demonic Eye. The battle arena has four pedestals placed in a square around the edges. Once the battle begins, each pedestal will light up with a Tainted Eye activateable lever. As the boss takes damage, he will periodically activate Demonic Eye, which has a fairly long cast timer. During this time, all four players should go to different pedestals and activate the Tainted Eyes to gain a buff that prevents you from taking damage and debuffs from Demonic Eye (the buff is called Gloaming or something).


Catoblepas will also make his eye targetable from time to time. This is a DPS check. It starts out blue, then turns yellow, and then red. I'm actually not sure what happens if it passes red because we always destroyed it in time, but I imagine it has something to do with turning people to stone or killing them.


Lastly, this boss has some rough conal AOEs. It can turn toward a player and cover a good 1/3rd of the arena in a massive conal AOE that can be somewhat hard to dodge if you're directly in the center of it.


The Hall of the Secutores
The final boss is a series of battles. It starts with four combatants that will try to break apart your party. The Lancer seems to have no aggro table and will target someone randomly (he chose me as a Bard on our run), so just kite him around at first. There's a healer which obviously should die first. The Bard should probably die third, followed by the Gladiator. Keep in mind that these characters appear to have level 50 abilities appropriate to their job, so expect the Gladiator to be using Spirits Within and such. Overall, this section was pretty easy.


The second phase starts after the trash people are killed off. A red demon and a little Lalafell named Mumepo the Beholden show up. Mumepo does not appear to need tanking, but the red demon does. We took out Mumuepo first for the following reason:


Mumoepo will choose two members of your party (it doesn't appear to ever pick the tank) and chain them in place before starting a massive AOE with a slow cast bar. The remaining unchained person needs to save them by finding the "Thal's Scepter" interactive lever around the arena to unchain them before the cast bar fills up. Then the two chained players run out of the AOE before it goes off if everything goes well and no on takes damage. The damage is pretty severe if this fails (it was doing upwards of 1/2 to 3/4 of our WHM health bar). Once Mumoepo goes down, the rest of the fight is unremarkable. The red demon thing has a rear tail swipe, so keep that in mind if you're melee. Otherwise it was tank-and-spank from there on.


REWARDS
Boss 1: 20 Tomestones of Mythology
Boss 2: 30 Tomestones of Mythology
Boss 3: 45 Tomestones of Soldiery


TREASURES
A. First Area to the far left about halfway to the boss room
B. Boss 1 Reward
C. In one of the alcoves in the old Bomb-filled Room
D. Second Area in the left alcove of the Firemane room
E. Boss 2 Reward Left Coffer
F. Boss 2 Reward Right Coffer
G. Final Boss Reward


The Lost City of Amdapor Guide

(Courtesy of http://ffxiv.consolegameswiki.com/)


Decaying Gourmand
When you have the link, run away to not let the Goobbue's stomach absorb you. If you are eaten, your party members need to damage the stomach til you're released or you would die.


Arioch
There are a bunch of moth adds in the fight, the adds will add debuffs to party members. The boss will attack the player with the most debuff. AoE the adds if possible.


Diabolos
There are 8 doors divided into pairs of 2 in the boss room. The strategy is to have each member of your team responsible for one symbol, the blue goobbue, red demon, the light green dragon-like, and the dark green moth. Each symbol will appear above 2 doors. Make a progression of who will open their doors first, this is important for later. When you open both doors you get sucked into a void and you become immune to attacks, When Diabolos casts Ruinous Omen, you need to use the doors or the party will wipe. At the beginning of the fight have one of your party members open his first door, and leave it open, when you get to about 60% of Diabolos health, he will go to the center of the arena and start to cast Ruinous Omen, once it gets about halfway through the cast bar have the party member open his matching door. If timed right you will get into the void as soon as he casts Ruinous Omen and you won't take any damage. If your damage is halfway decent you should only see Ruinous Omen twice, so two of your party members will have to do it. Remember, you need to look around and memorize the positions of the 2 matching doors you're responsible for.


Avoid the orbs when they appear, they apply heavy and deal more damage as the debuff gets stacked on the party.


Note: have your healer take the job of opening the doors instead of the tank and dps. Open the first door when you can and stand near the matching door if needed. If done right, the group wouldn't be taking enough damage for the healer to be doing much healing.


Note: When given the buff that makes you immune to attacks, aggro may change if you have a summoner or scholar with a pet out. Diabolos may switch to the let and they do not get the immunity buff, so summonses could use Titan at that point.

King Moggle Mog Extreme Mode Guide

Video: King Moggle Mog Extreme Cleared by Yuuchi Izumi (Gilgamesh)